As mentioned, this temperate map is dominated by a large swath of open water between the two start points, and has a mix of islands scattered about.
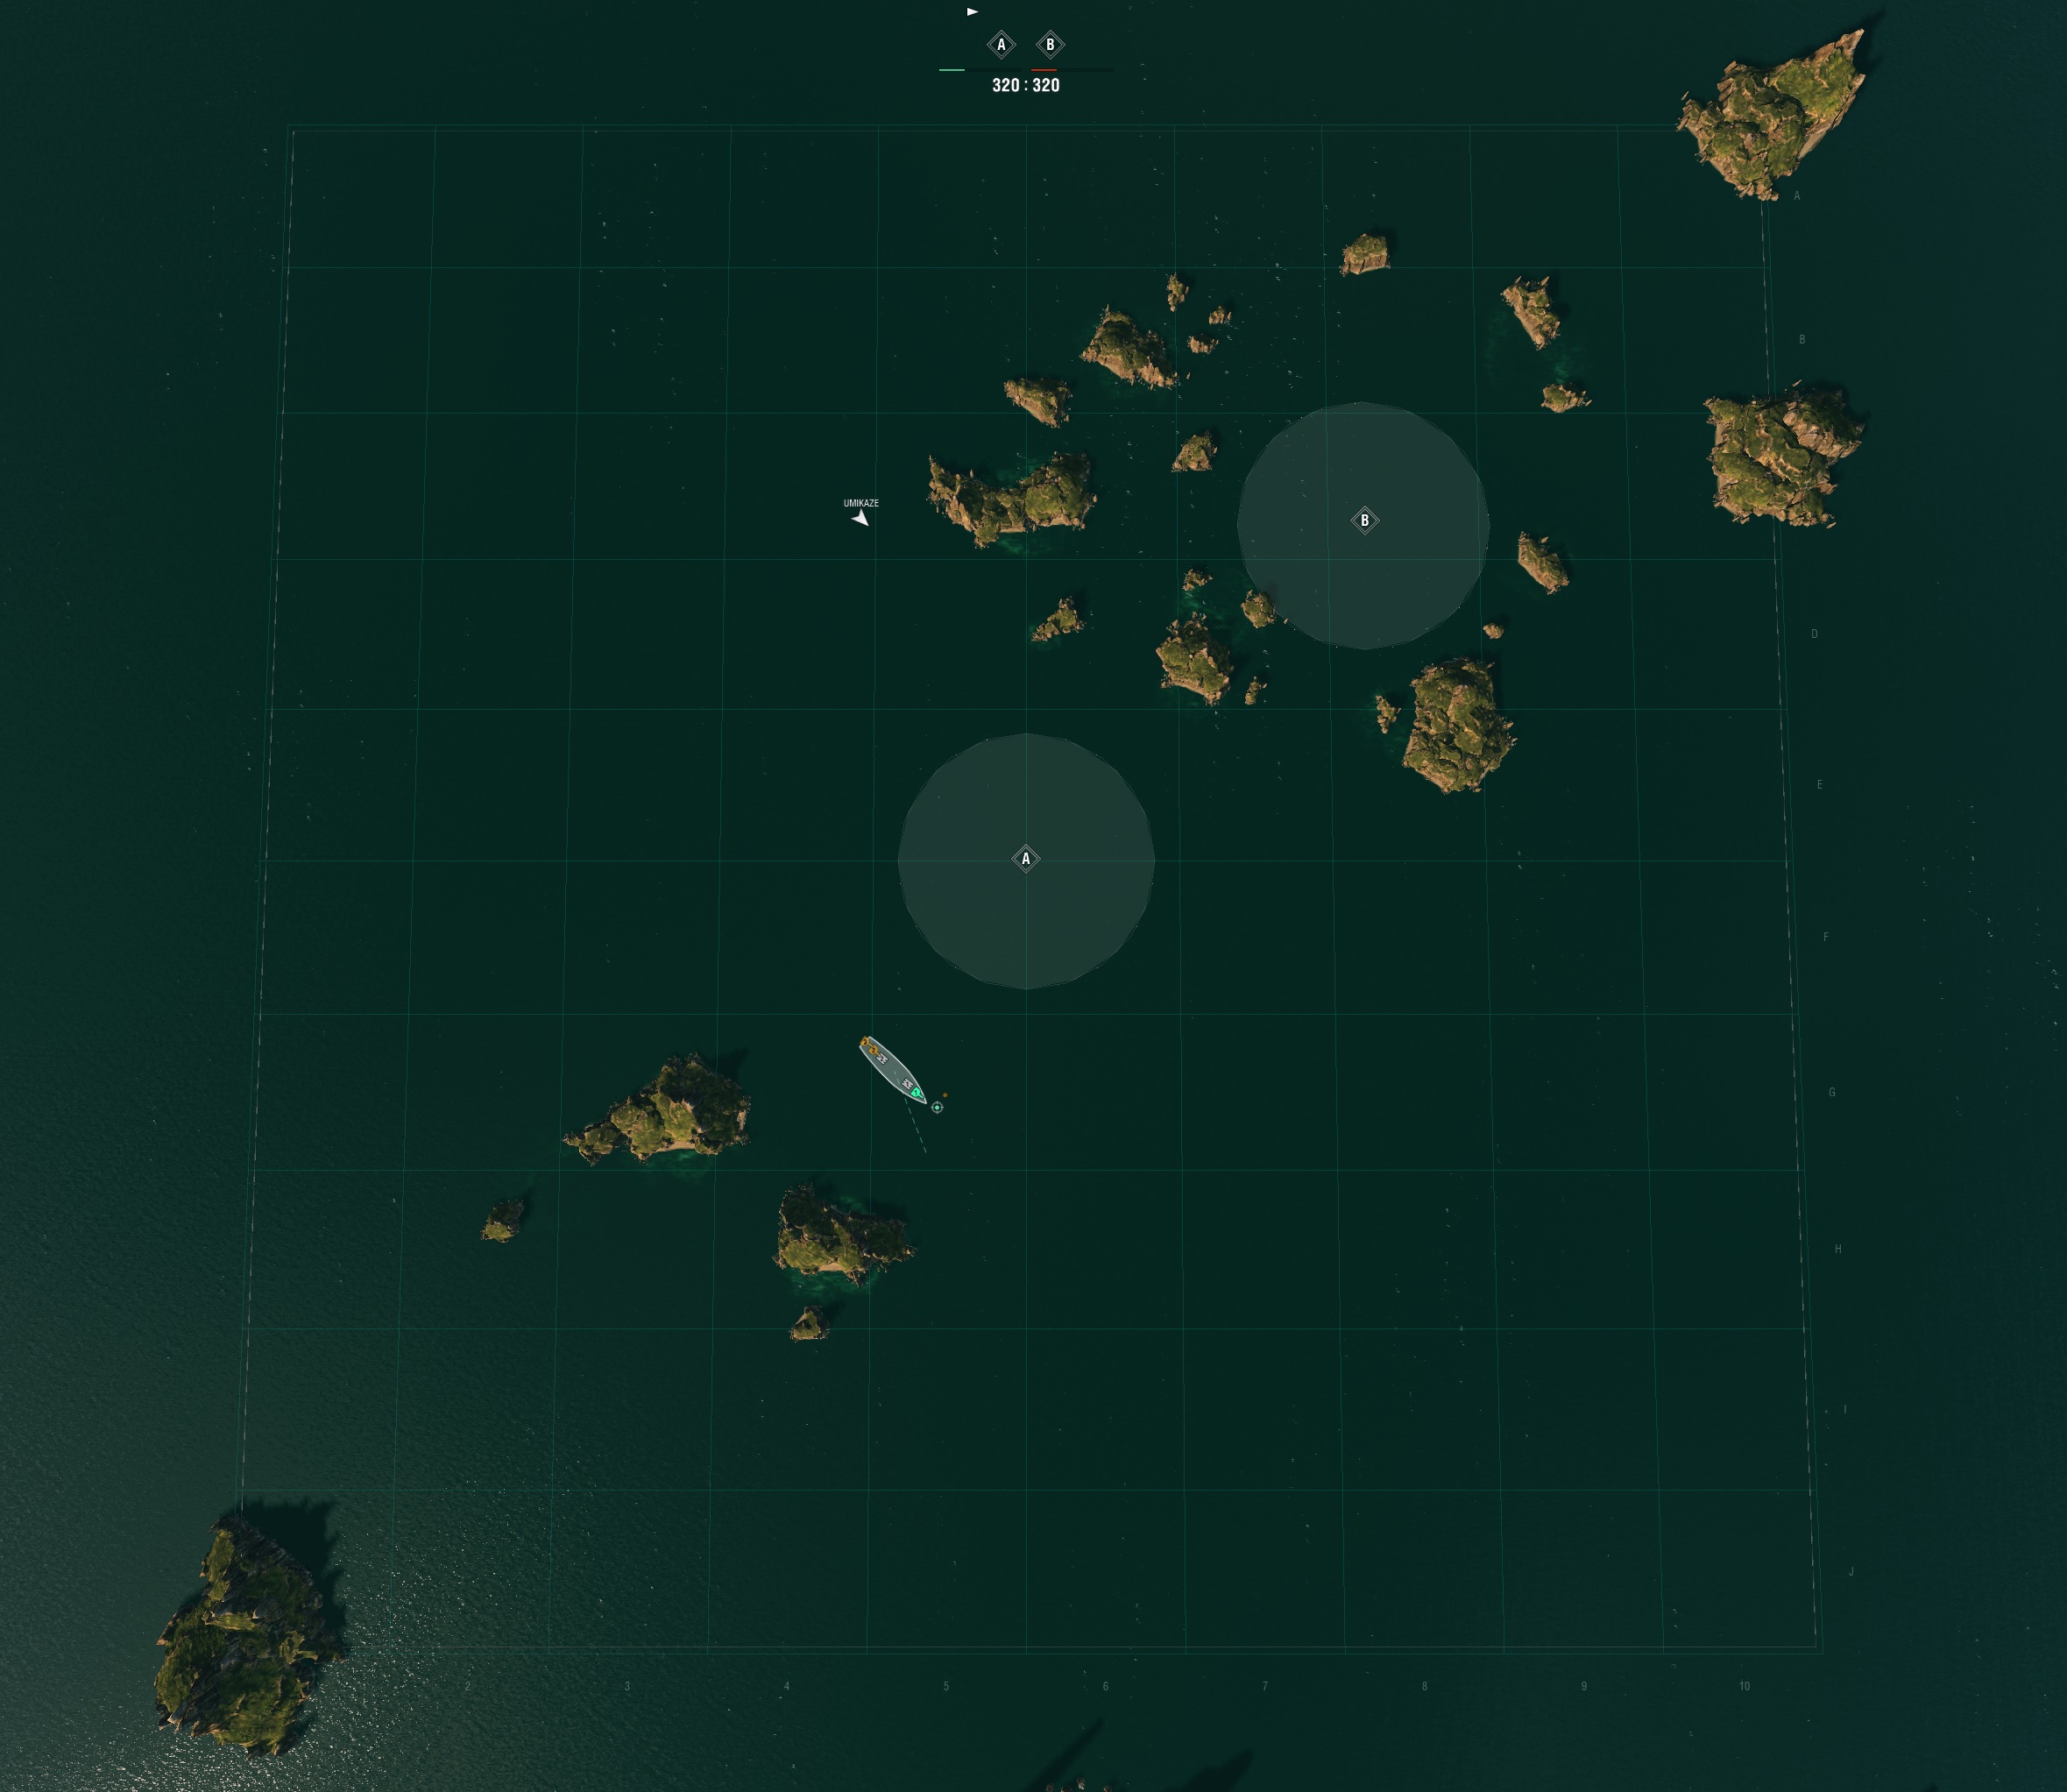
Atlantic Map
As you can see here, two cap points exist on this map, in the center and NE corner among the islands there. Since the SW corner has no cap in it, it is by nature less important, but can offer some interesting strategies.
Each square on this map represents XY km, so the caps themselves are about ZZ across.
Atlantic – General Considerations
Usually, a fight will focus around the A cap in the center, with peripheral conflict taking place over the B cap between smaller and fewer ships. Battleships on the North side tend to drift about slowly between D2 and A5, while those on the South side end up moving H6 to E9. I’m not saying this is bad or good, this is just what you will usually see.
From a recommendation stance, I always like to see teams push on A right away. I’ll explain in the summary section.
North Side Start
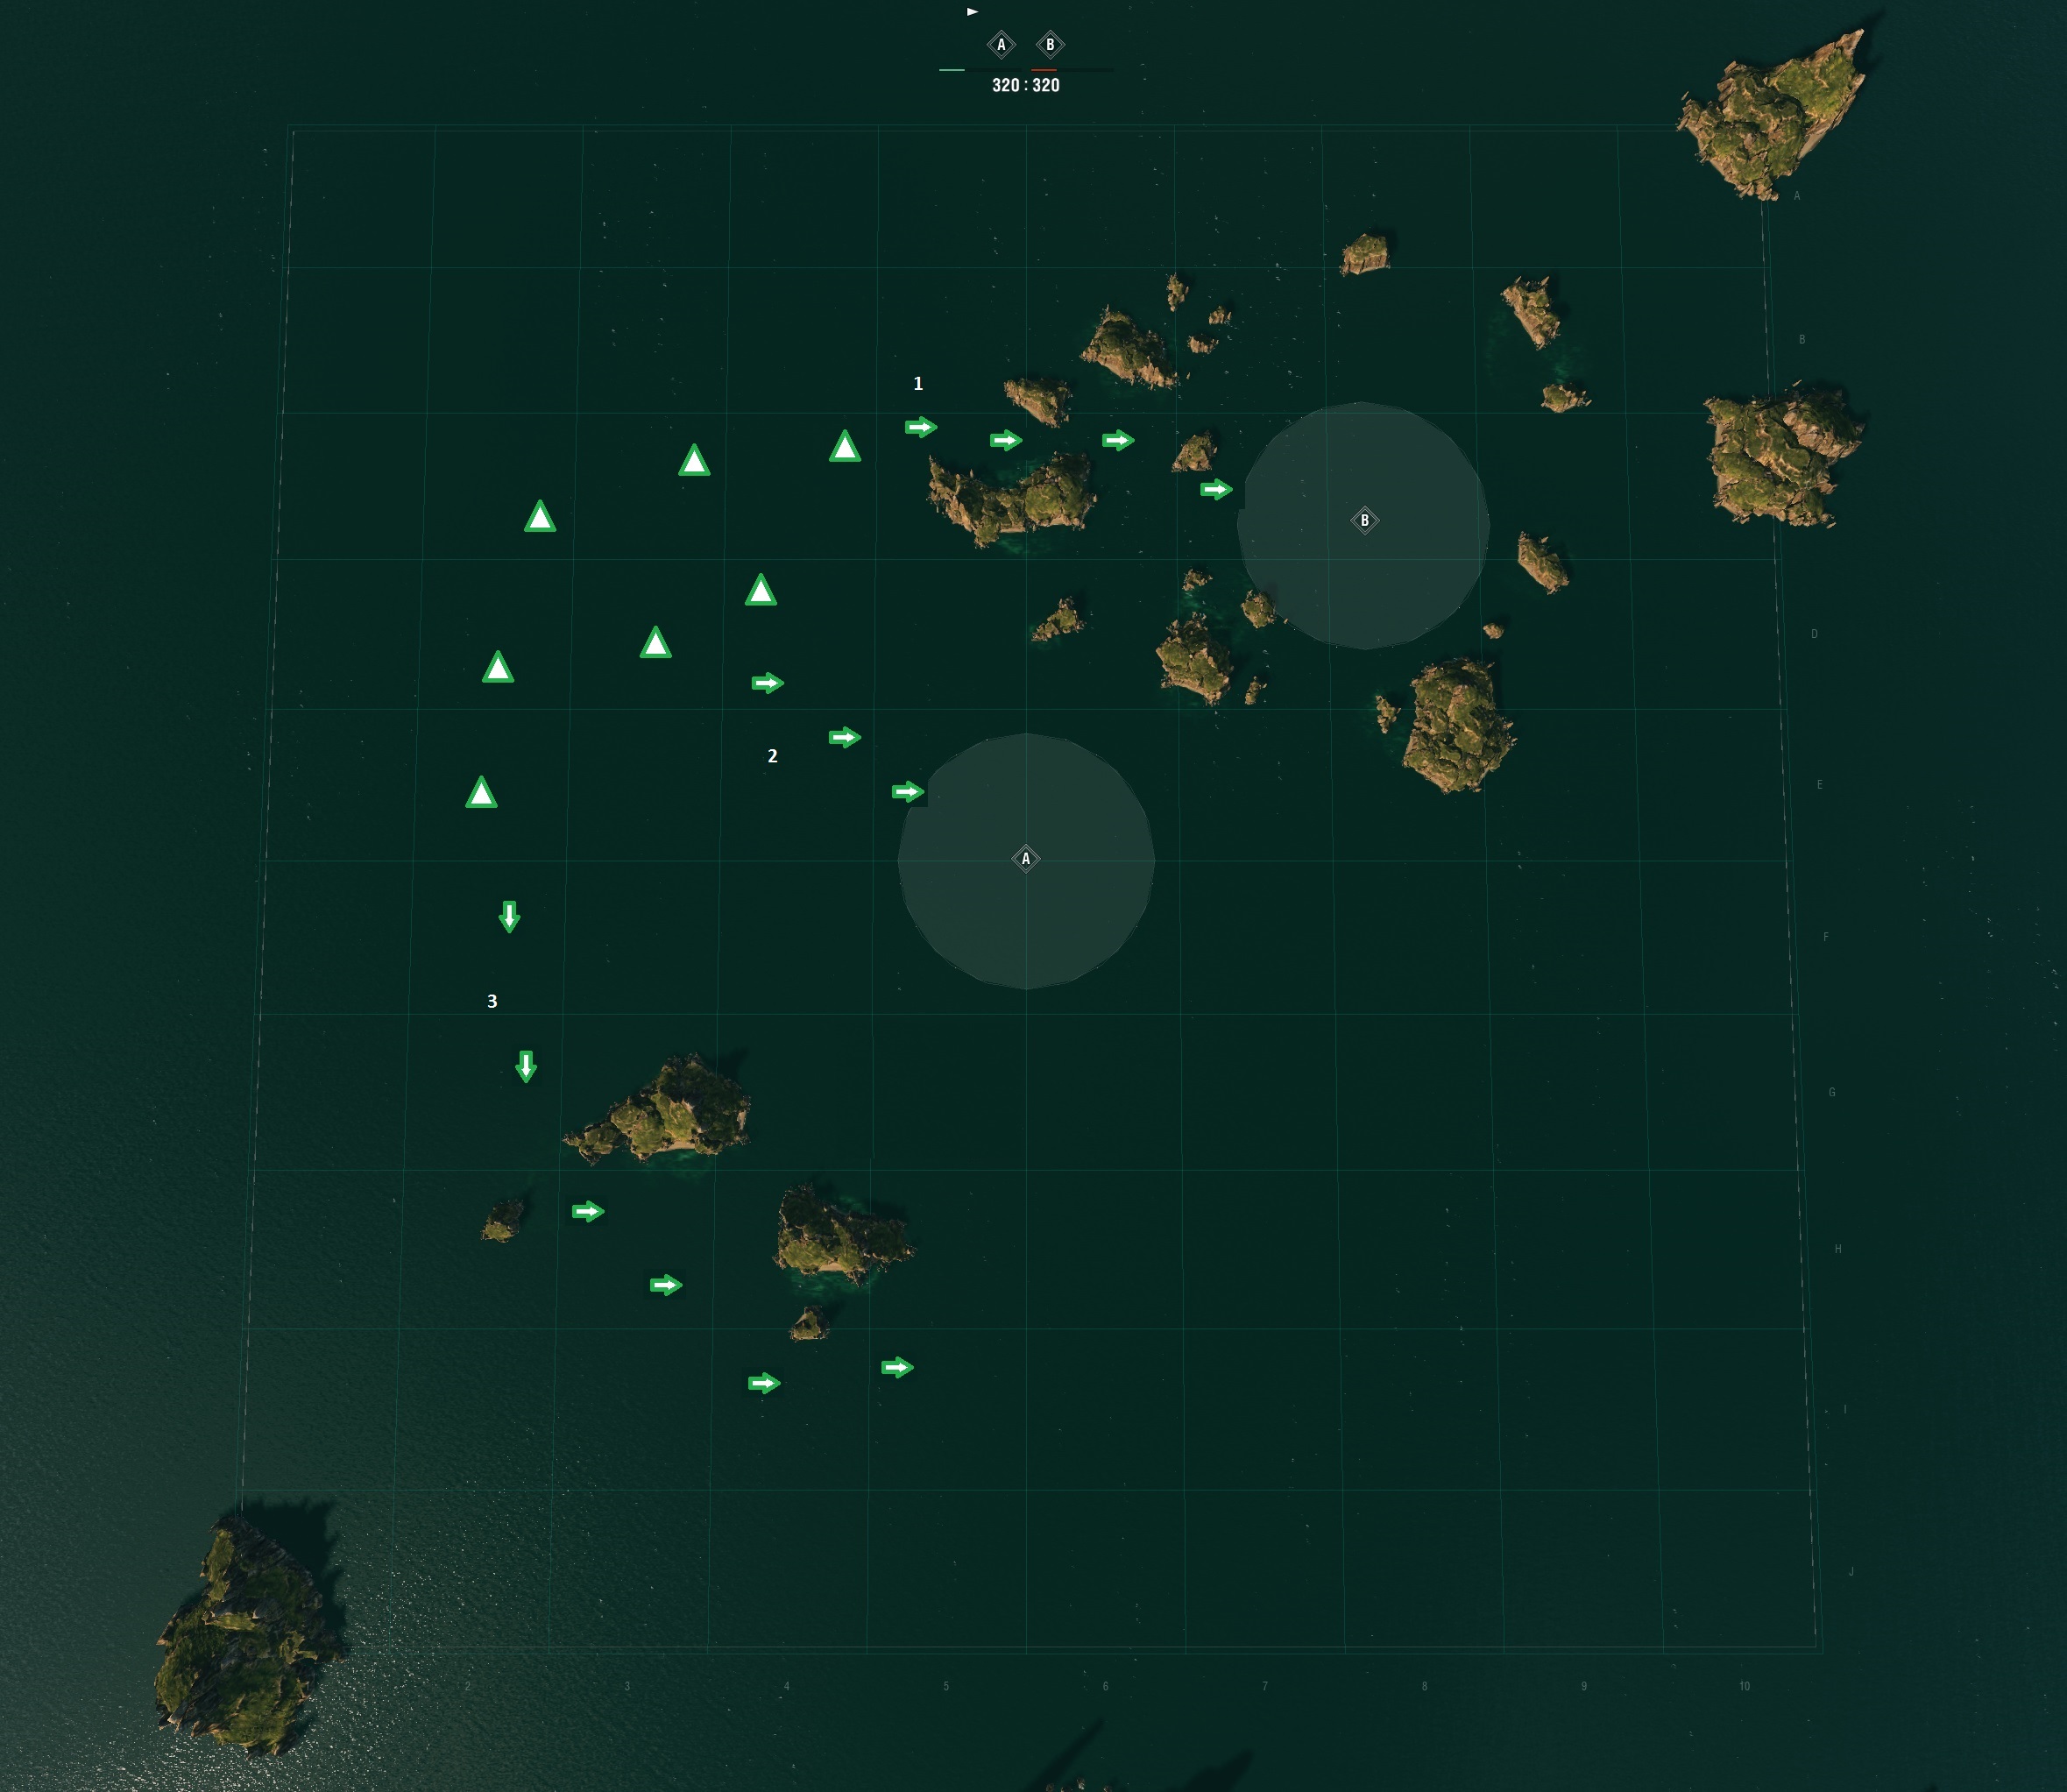
Starting from the North side, the choice of which cap to push with your big guns will decide really how fast this game will go, and your team will end up choosing whether this is a “fight now” or “fight later” option. Have a look at the image below.
Pushing cap A takes advantage of the fact that your ships are already pointed nose-on to the enemy, giving angled armor and smaller profiles to shoot at, while your forward guns will have unobstructed shooting at the enemy. Pushing cap B uses the islands to provide cover for your weak sides, and although the islands will also block your fire when they interpose between you and your target, you’ll also have the opportunity to fire all your side guns with minimal steering adjustment.
Atlantic, North Side Start
General Strategy: send one DD to cap A right away, one DD to B as well (potentially with a second if you have it to spare and it looks like the enemy might have enough to cause trouble for the first). Main force straight to A and start focus-firing cruisers if they have no DD to shoot. The DD capping B should reinforce the main fleet as soon as job’s done, or act as a delaying force if the enemy is pushing at B.
Approach 1 is a general pathing of where you’d go when pushing B cap – you don’t want to go further North because you’ll take more time to reach the cap than the enemy will (and they might gain a slight point advantage out of this), and you don’t want to go further South because this will expose you to concentrated fire from the entire enemy team. Sending one or two fast ships (DD or DD+CA, but never without a DD) here for a fast cap of B – or two prevent the enemy from doing so – is best. If your DD reaches the cap and can cap without opposition, any extra force should detour back to A cap and help the main fleet. It is worth note that the team starting on South side has a good chance that they’ll be pushing this cap too – in which case your DD can smoke and torp for a short time to intimidate the approaching fleet, with the intention of denying the area for 15-30 seconds or more.
Approach 2 is obviously the path to take when pushing A cap…a straight-on approach. This keeps your nose pointed at the enemy (to make best use of your armor), and you can make minor changes to your course if your enemy team is making a heavy push to B cap. Your ships can also support a DD on B cap with long-range fire if needed. The bulk of your fleet should be pursuing this course, with DDs in the lead and big guns training their weapons on the cap point in order to quickly put fire on enemy DDs lit up by friendlies. Cruisers should precede BBs by a few kms, and spread out a bit so that one is closer to Approach 3 in case an enemy DD decides to try any funny business.
Approach 3 is generally useless, except if your team has four or more Destroyers – if this is the case, you should hold three or more DDs with your main fleet and detail one or two fast gunboats along route 3. This is absolutely necessary if the enemy also has 4+ DDs, as they are almost guaranteed to be sending at least one your way along that path as well. A carrier squadron can easily sub in for a DD here. If your detachment meets no opposition along the way, then you have two DDs who have potentially set up a crossfire against the enemy fleet. Just make sure they have the brains to evacuate if the entire fleet comes down after them (because then they can lead the fleet around on a goose-chase while the rest of your team caps A and B).
Carriers should put a fighter squad over both A and B cap as soon as possible to light things up and hold them lit until the air battle begins in earnest. Sending a bomber squad over approach 3 can also be useful, so long as you can retrieve it quickly when needed.
Alternative Strategies:
- Heavy push to B cap – although inadvisable under normal circumstances, if your team is largely composed of DDs or highly mobile cruisers, you can use the islands to your advantage and dominate the terrain against larger ships.
- All to A – if you don’t have lots of mobile forces, proceeding to A is the best bet. If you don’t have at least one DD though, you will probably find the enemy will gain a few ticks worth of capping on you by beginning theirs sooner, and may be able to deny you the cap for a while by parking a hidden DD on the opposite side of A cap. Not a good plan without at least one very fast vessel.
South Side Start
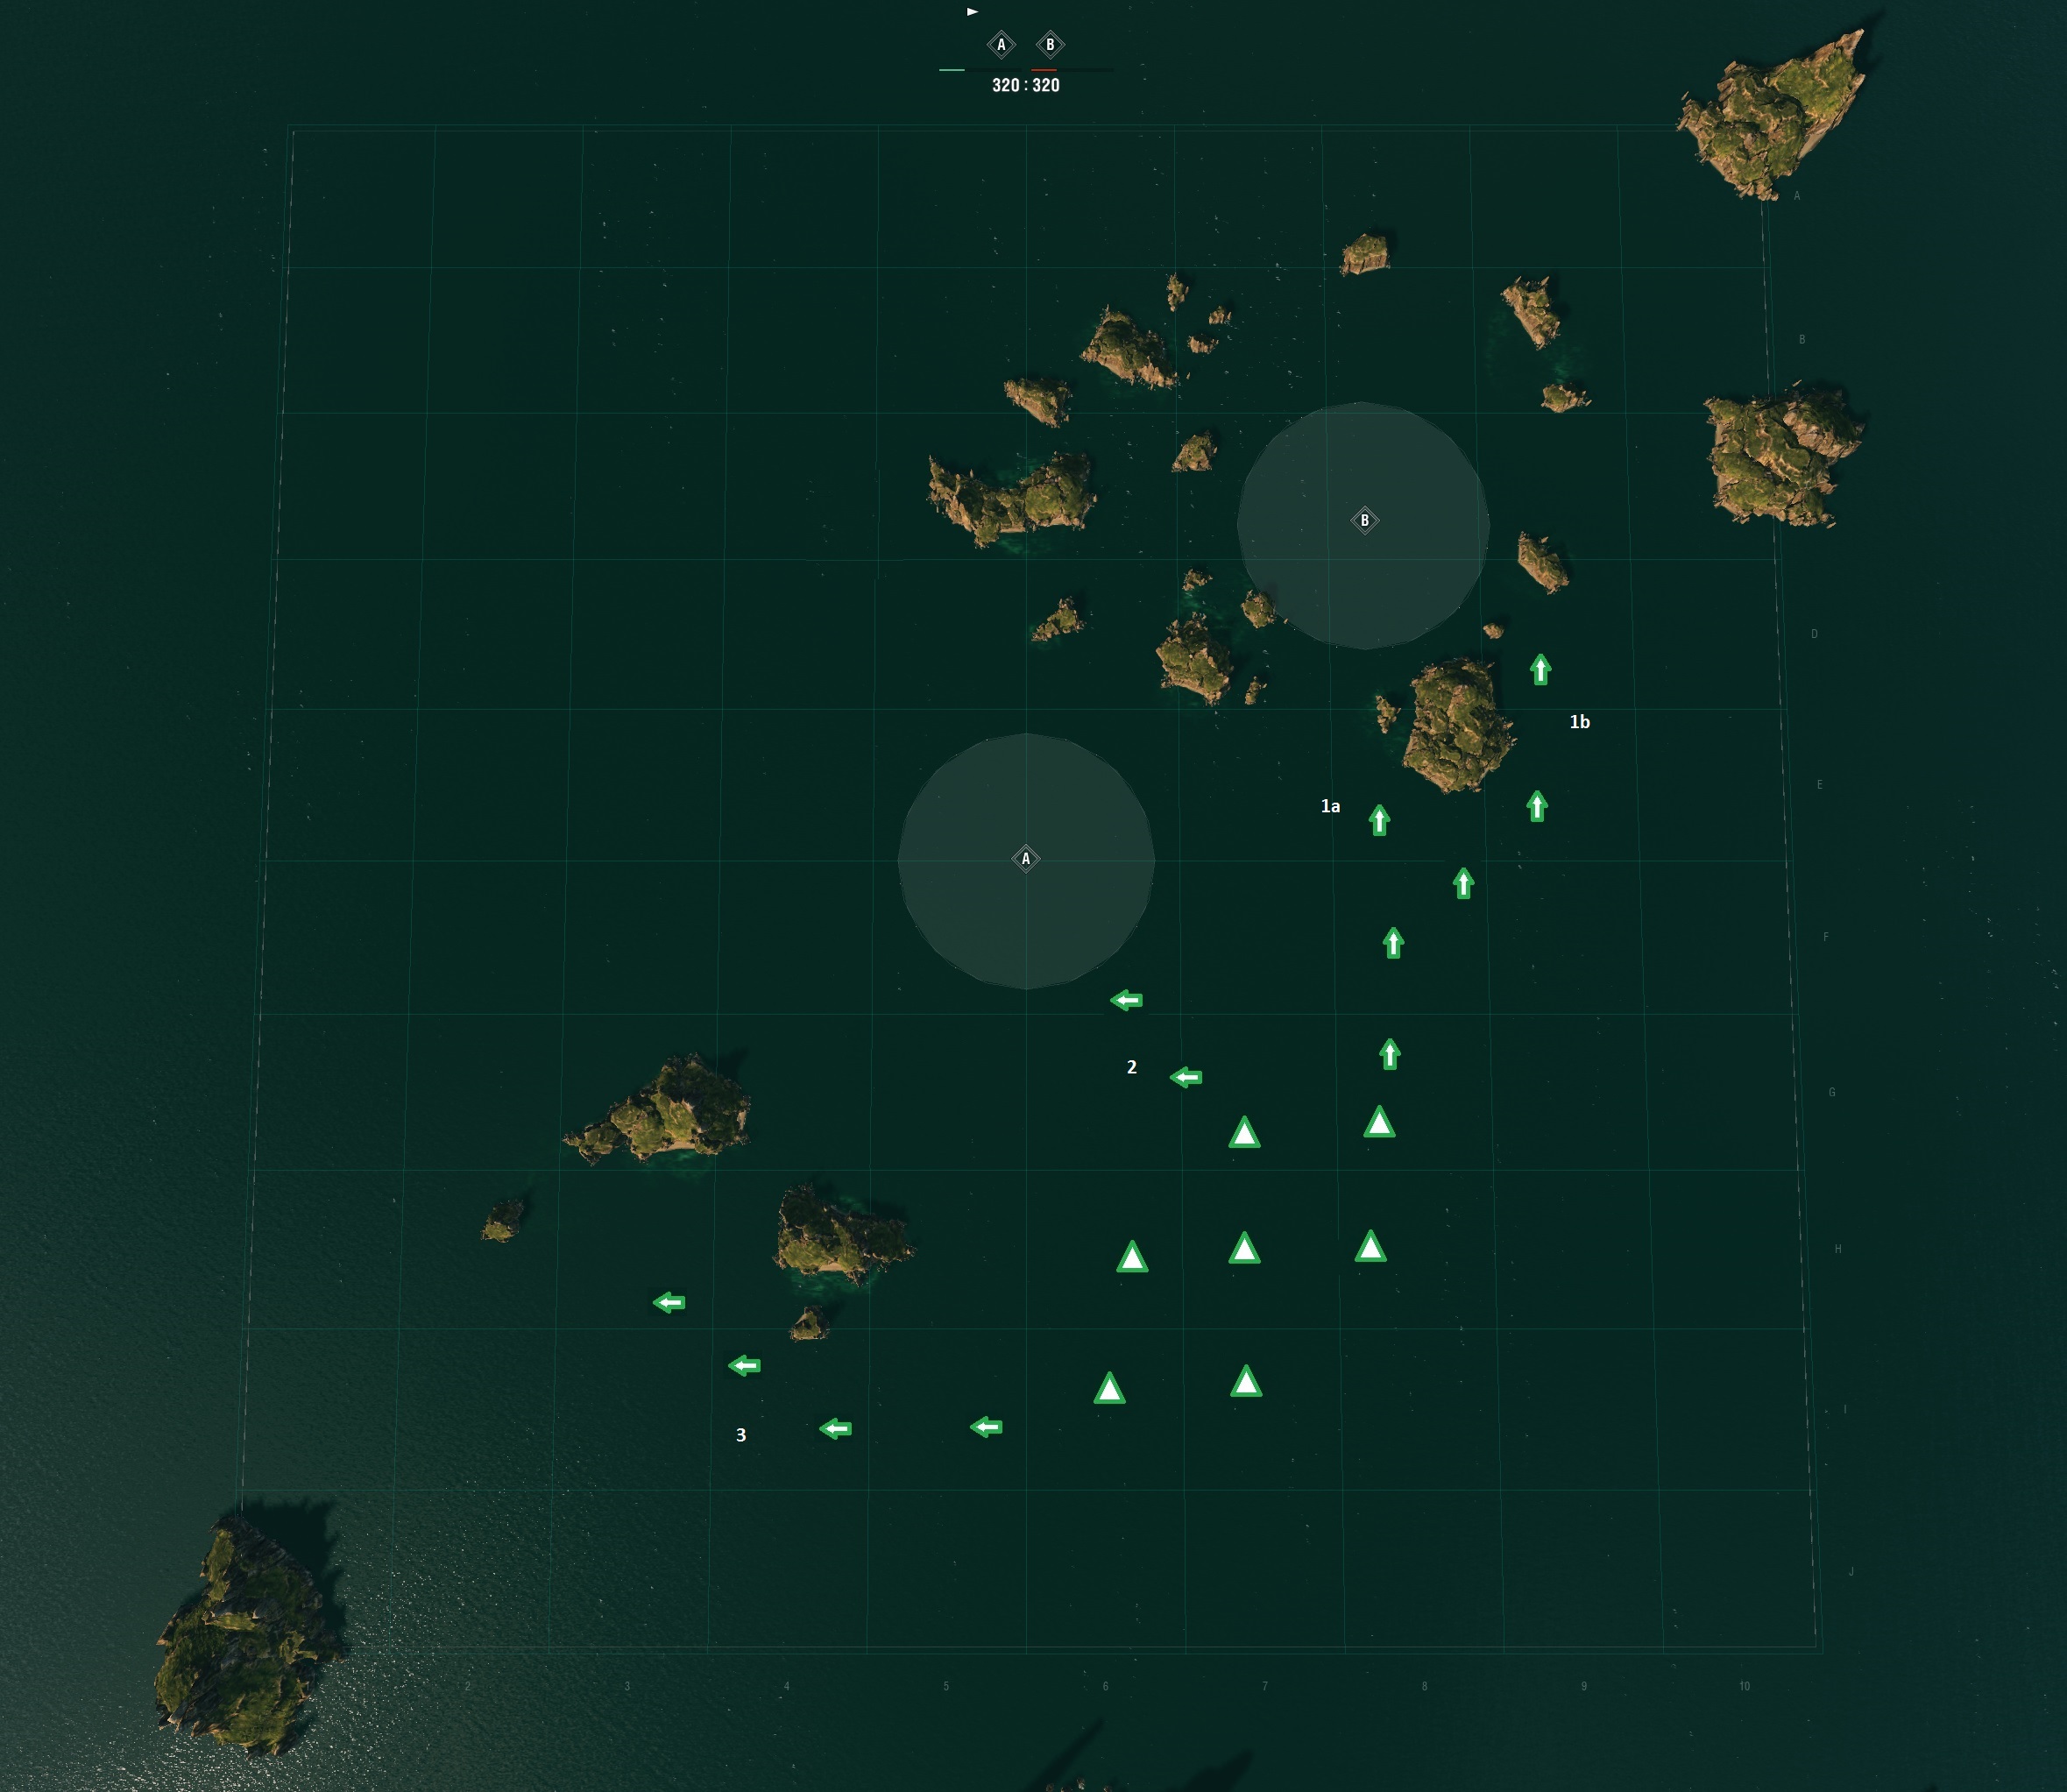
The South side start for this map, as I mentioned before, does have a slight differentiator on the determination of how this fight will work out – you won’t get to choose now/later the way the North side will. To look at it plainly it might appear that you have just as much option, but really that’s a deception here. The reason being is that if you go and push heavy to B cap, you’ll be presenting your broadside through open water to ships which are able to fire from the cover of the North islands (using spotter planes or approaching to invisi-fire distances). The North starters, being closer to island cover, get to choose to duck into cover before being spotted or to charge nose-on.
Your start position is also (and I bungled it a little on my map here) a little closer to the South islands, which is probably what the map designer considered a ‘balanced’ position. If this were only a single cap in the center, that’d be true. These caps must have been added after the designation of start positions though, because even though your team will start as close to cover as the North team, the cover is missing a significant strategic factor – a cap. And in this game, capping is winning.
Atlantic, South Side Starting Position (approx)
General Strategy: My recommendation for this start sounds remarkably like the North side: send one DD to cap A right away, one DD to B as well (two if you have them to spare and one might not be enough). Main force straight to A and start focus-firing cruisers if they have no DD to shoot. The DD capping B should finish capping and either scuttle around the North side of the islands if there is no opposition, or head straight to B if the big fight is there.
Approach 1 is a general pathing of where you’d go when pushing B cap – DDs follow “1a” and CAs (and possibly Russian DDs) follow “1b”. Reason – DDs will spot approaching ships with less chance of giving away their position and taking fire, while CAs can hide their sides from long-range snipers behind the island during the approach. If you have no DDs, it might be worthwhile to send a fast cruiser there, but without Destroyer cover, a cruiser will likely do nothing but get his ticket punched by a lightweight enemy throwing a torp wall from behind an island at <4km.
If your DD meets no opposition here, any accompaniment can return to help the main push on A (though it will have to either circle and go N of the island, or lose time by circling in the shade of it). It will also be presented with two good follow-up choices – head NW through the islands to get the enemy in a crossfire, or head SW to join the main fleet on A cap. Given the nature of the fighting that is likely to be going on, heading straight into the fight is probably going to be a mistake, as you’ll get spotted right away and the entire enemy fleet probably has guns already pointed in your general direction. Instead, the better choice is the North West line, which will give you the chance to ambush any approaching forces trying to take B away, and if you don’t meet any, you then can catch the enemy with most of its guns pointed away from you. If they want to shoot you, they have to stop shooting your main fleet (either turning their hulls or their guns away, either of these grants an advantage to your fleet). You may also be able to direct their movement with torpedoes, and there’s a good chance you can score some torp hits on enemies who aren’t expecting them to come from behind.
I quite often see Battleships following the “1b” route…and while they occasionally manage to dominate the cap, four times in ten they get deleted by an enemy DD in short order, five times in ten their main force gets eliminated quickly on A cap (leaving them as stragglers with a point and ship deficit that then have to fight their way to try to take A cap from a superior force), and perhaps one time in ten they manage to win the game. RNG is probably the deciding factor on that.
Approach 2 is the recommendation for the main body of your fleet, just like the North starters. It keeps your nose pointed at them to max your armor while taking the shortest route to a cap, and gets the fight on fast. Support for a DD on B cap can occasionally be performed, but largely this approach just forces the enemy’s hand if they want to take points on A. As with the North side, the bulk of your fleet should be pursuing this course, with DDs in the lead and big guns training their weapons on the cap point in order to quickly put fire on enemy DDs lit up by friendlies. Same deployment pattern.
Approach 3 is still the runt of this contest. Same deal as for North start.
Carriers should put a fighter squad over both A and B cap as soon as possible to light things up and hold them lit until the air battle begins in earnest. Sending a bomber squad over approach 3 can also be useful, so long as you can retrieve it quickly when needed. CVs should get their hulls towards G/H 9-10 initially, and then follow in the shadow of the main fleet about 8km behind.
Alternative Strategies:
- Heavy push to B cap – see above regarding this.
- All to A – see above.
